Driving Light Bulb Replacement
 This page documents the replacement of a bulb in a driving light on a '96 Dakota SLT
Click on any image to get a double sized version.
- Tools Required:
 Phillips head screwdriver
-
Possibly a flat head screwdriver (to use as a pry-bar)
- Cost:
-
About 3 to 4 dollars for a new bulb.
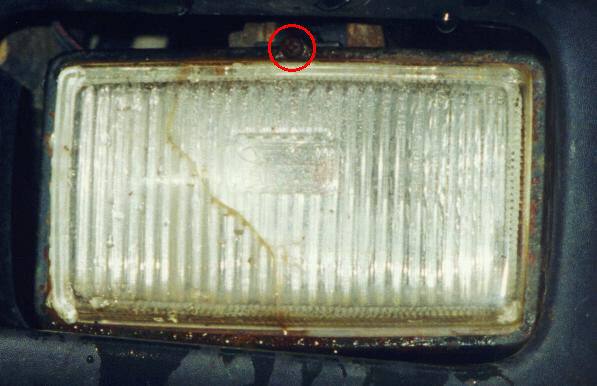
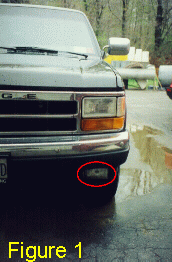
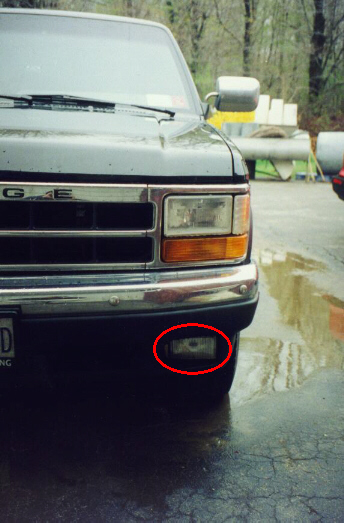
Figure 1 at the left shows the light which has burnt out (circled
in red). This happens to be the left driving light, but the procedure is the same for
the right light as well.
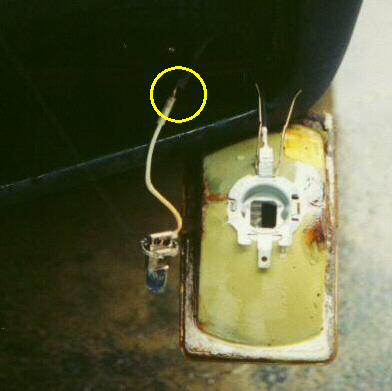
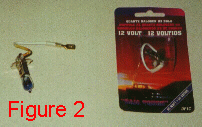 Figure 2 at the right shows the burned out light and the replacement light
which I got at Wal*Mart for about $3.50. I also noticed the same bulb in Parts America; it should
be available in most any auto parts or department store. Notice that this is not just a bulb, but
a bulb with a wire attached to it. This bulb is known as an "H3 bulb" Make sure that you
get the 55 watt version, as they also come in 100 watt and 130 watt versions. (Unless of course
you want the extra light, for off road use or whatever. Keep in mind that because the driving lights
are off when your high beams are on, getting a higher wattage driving light will not help you to see
further at night; you'll just blind people when you turn your low beams on. If you want better light
for high-speed night driving, you'll want to upgrade your high beams, not the driving lights. Also,
if you use a wattage other than 55, you'll want to change both bulbs, so your truck doesn't look
completely stupid at night.) ;-)
Figure 2 at the right shows the burned out light and the replacement light
which I got at Wal*Mart for about $3.50. I also noticed the same bulb in Parts America; it should
be available in most any auto parts or department store. Notice that this is not just a bulb, but
a bulb with a wire attached to it. This bulb is known as an "H3 bulb" Make sure that you
get the 55 watt version, as they also come in 100 watt and 130 watt versions. (Unless of course
you want the extra light, for off road use or whatever. Keep in mind that because the driving lights
are off when your high beams are on, getting a higher wattage driving light will not help you to see
further at night; you'll just blind people when you turn your low beams on. If you want better light
for high-speed night driving, you'll want to upgrade your high beams, not the driving lights. Also,
if you use a wattage other than 55, you'll want to change both bulbs, so your truck doesn't look
completely stupid at night.) ;-)
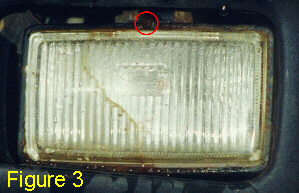
Figure 3 at the left is a close-up of the driving light. Use a phillips head
screwdriver to remove the screw at the top of the light. (Circled in red.)
Next, remove the small metal frame around the light. (There is a little tab in the frame at
the bottom which is inserted into the light; you may have to pry or pull down on the air-dam
to get enough clearance to remove the frame. Be careful with the frame; it is on the fragile
side and it could easily bend or break, especially if there is any rust on it.
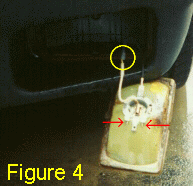
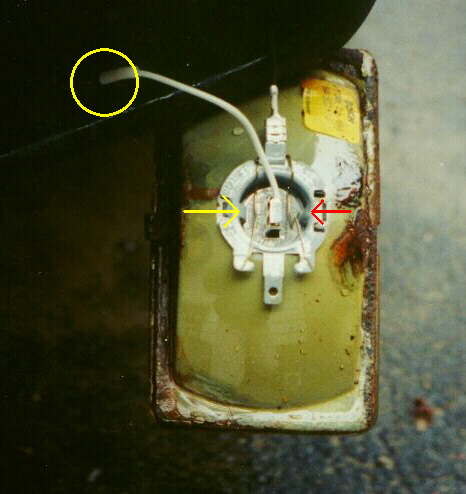
Next, pull the light out out of the air-dam, as shown in Figure 4 at left.
In order to remove the bulb, just squeeze on the ends of the little metal clip which is holding it in,
and swing it aside. (pointed to by the red arrows in Figure 4)
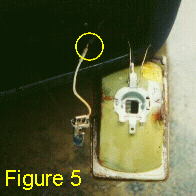
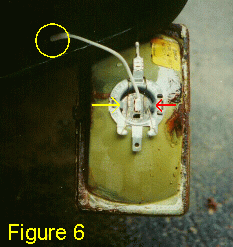
You will also have to unplug the wire that connects the bulb to the truck. (Circled in
yellow in Figures 4, 5, and 6
You can't insert the bulb the wrong way because it has a square notch in the bottom, and
a rounded notch at the top, which match protrusions in the light housing itself. (In
Figure 6, the yellow arrow is pointing to the square notch, and the
red arrow is pointing to the rounded notch.) Insert the bulb, and replace the metal
clip that holds it in place.
DO NOT TOUCH THE SURFACE OF THE BULB! Only touch the metal and wire parts of the
new bulb. If you touch the glass, be sure to clean it thouroughly. If you were to touch
the glass, oil from your skin would rub off onto the bulb. When the bulb heats up, this
oil would also heat up, and create a hot spot on the bulb, greatly reducing its life.
Jon Steiger (jon@dakota-truck.net)
April 25, 1998
 Back to the DML Home Page
- Back to the Maintenance, Modifications & Upgrades Section
Back to the DML Home Page
- Back to the Maintenance, Modifications & Upgrades Section

 This page documents the replacement of a bulb in a driving light on a '96 Dakota SLT
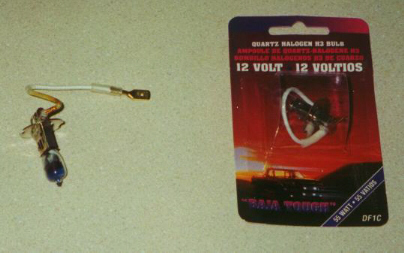 Figure 2 at the right shows the burned out light and the replacement light
which I got at Wal*Mart for about $3.50. I also noticed the same bulb in Parts America; it should
be available in most any auto parts or department store. Notice that this is not just a bulb, but
a bulb with a wire attached to it. This bulb is known as an "H3 bulb" Make sure that you
get the 55 watt version, as they also come in 100 watt and 130 watt versions. (Unless of course
you want the extra light, for off road use or whatever. Keep in mind that because the driving lights
are off when your high beams are on, getting a higher wattage driving light will not help you to see
further at night; you'll just blind people when you turn your low beams on. If you want better light
for high-speed night driving, you'll want to upgrade your high beams, not the driving lights. Also,
if you use a wattage other than 55, you'll want to change both bulbs, so your truck doesn't look
completely stupid at night.) ;-)
Figure 2 at the right shows the burned out light and the replacement light
which I got at Wal*Mart for about $3.50. I also noticed the same bulb in Parts America; it should
be available in most any auto parts or department store. Notice that this is not just a bulb, but
a bulb with a wire attached to it. This bulb is known as an "H3 bulb" Make sure that you
get the 55 watt version, as they also come in 100 watt and 130 watt versions. (Unless of course
you want the extra light, for off road use or whatever. Keep in mind that because the driving lights
are off when your high beams are on, getting a higher wattage driving light will not help you to see
further at night; you'll just blind people when you turn your low beams on. If you want better light
for high-speed night driving, you'll want to upgrade your high beams, not the driving lights. Also,
if you use a wattage other than 55, you'll want to change both bulbs, so your truck doesn't look
completely stupid at night.) ;-)